Animation videos have become more and more popular and gain lots of attention in recent years. They have become a powerful weapon in market strategy. Among animation videos, character animation is the most popular form of video. With the animated character, audience’s mind will be guided following the message contained in the video.
What is animated character? Animated character is actually contains two parts: the skin (represents static photo of character) and the skeleton. The process of creating animated character can be defined into setting a complete skeleton underneath the skin to control its movement. So the essential part is undoubtedly the skeleton. With skeleton, even static photo will be empowered to be movable.
But this process may be a bit difficult and complex. It needs you to be patient and careful. At the very beginning, you need to possess a powerful tool to help you create animated character. Mango Animate Character Animation Maker is exactly what you need. With the best tool, and this best tutorial, you are sure to turn your photo into animated character with ease.
A complete tutorial for you:
- Prepare Material And Import
Mango Animate Character Animation Maker is a 2D skeletal animation software and devoting in creating realistic animated character. To better satisfy your needs, it allows you to import your own PNG and PSD file to make your own animated character. Of course, there are multiple built-in preset characters for you to choose.
- Create Skeleton
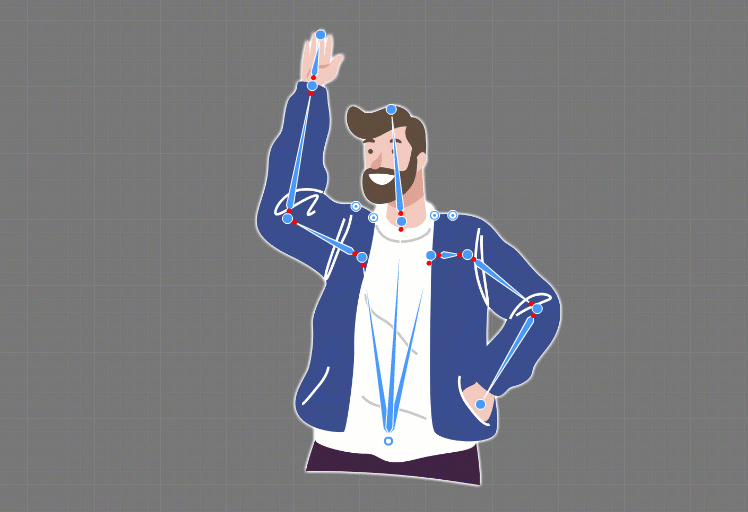
At first, you are supposed to get to know what is parenting in skeleton world. The bone structure used for skeletal animation is usually hierarchical, which means that the bones have a child and parent relationships. Only if a skeleton has this relationship can it be complete. Parenting is the process of creating a hierarchical structure for your character, which dictates how bones affect one another thus to create a motion. What this means is that if you rotate or move a bone higher up on the hierarchy (the parent), it will affect all the bones under it (the children). On the contrary, if you are about to rotate or move bones underneath another one (the child), it will not affect the parent.
Bones and joints make up a complete skeleton. Your job is to create crucial joints including neck, elbows, knees and others. First of all, you need to create a root bone, which is the parent of every bone. In most case, root bone is placed at the middle of the character. Use the straight bone tool and simply click your mouse to create a joint, move your mouse to the next place and click to create the second joints. When the two joints are created, a bone is automatically occurred between them to connect them. If you want to end parenting and create another child, left click the mouse to end parenting and go back to the parent joint to repeat the operation that you did.
Once you have done with the skeleton, you’d better check out for any mistake. If the joints are placed at the wrong position, it may cause wired movement of limbs of your character. To make the movement of your character more realistic and natural, you can turn the straight bone into curved bone. With the curved bone, the all motion will not be stiff.
- Design Motion
Once you have done with the skeleton, it means that you have solved the most difficult part. In this step you are going to get your character move. Set your character in a series of successive posts by customizing the position of bones and joints. Drag the joints to move and rotate as your will. Aligning the position of each post in the timeline to determine the duration and speed of a motion. If you are weak in this step, there is nothing to be worried. Mango Animate Character Animation Maker offers up to 100 vivid motion templates for you to choose. All of them are available as long as your character has the same names of bones as the preset skeleton in the software. Drag the motion template that you need to the timeline and then your character will be able to move exactly like a human.
- Preview And Export
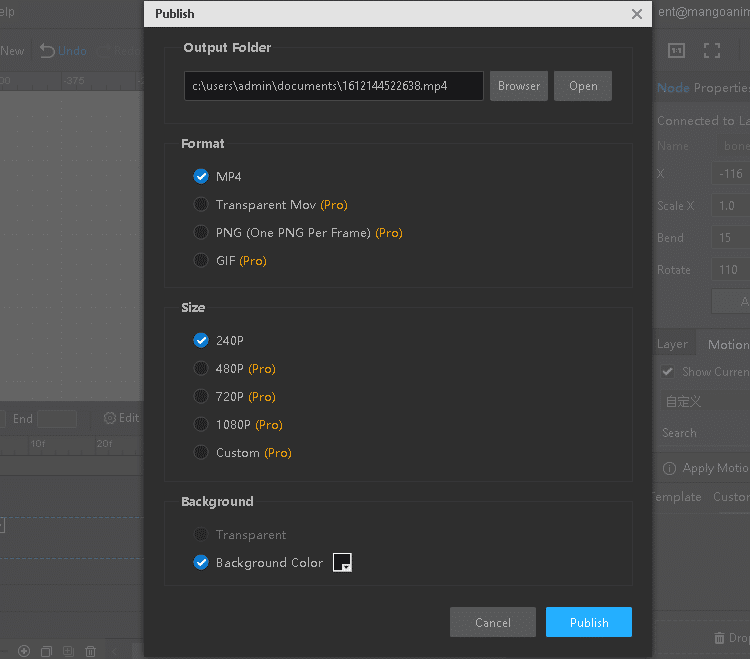
Congratulations! You have already finished this great project! Preview is necessary. Click the play button to view the motion of your character. Make sure that everything is perfect, and then you can export it to your local device. Mango Animate Character Animation Maker provides several formats for you, including MOV, MP4, PNG and animated GIF. Select according to your needs. After exporting, to let more people view your masterpiece, you can publish it on social media platform.


Wrap it up!
We can see that create an animated character is actually not difficult and complicated. Mango Animate Character Animation Maker has the fantastic magic to turn your photo into animated character. Keep this tutorial in mind, and it will be your great partner in creating animated character.