Animated explainer videos help in driving more traffic and generate awareness about your products and services. For that reason, animated explainer video matters the most and are in high demand. You need to convey the values of your business to potential customers. It can be possible with the help of an interesting animation video.
To effectively communicate with the audience, you can opt for Adobe After Effects to make an animated explainer video. We will guide you in this article about creating an animated explainer video using Adobe After Effects. Keep scrolling down and learn about the important animated video production steps for making your explainer video right away.
How to Make Animated Explainer Video in Adobe After Effects
- Import Files From Photoshop
Start with importing your files into your composition for an animation explainer video. Keep in mind that the layers tend to keep their individual qualities when you import such files. These files will appear on the animation timeline and you need to simply drag one onto the composition.
· Open New Project from the menu bar such as File > New > New Project.
· Once you’ve opened a new project, make sure to import the file – File < Import < File.
· Decide on your Photoshop file and click the Open button. Keep in mind that the import kind should be composition and carefully check that the Editable Layer Styles button is selected.
· After doing this, you will be able to visualize a new composition folder in your project browser panel. If you’re unable to see the panel, make sure to press Ctrl + O in Windows.
- Add Keyframes
For animated explainer video production, you need to add keyframes in the very next step. It is comprised of position, scale, rotation, and much more. By clicking on the triangle next to transform, you will see all the aspects of the keyframe. Keep in mind that it is the beginning and end of a transition. Make up your mind on the selected characteristics and click on the forward button to add the keyframes.
For instance, by dragging it along the composition, you can change the position from one keyframe to another for your animated explainer video. - Use Easing Technique to Smooth Out Transitions
When you add the keyframes, the transitions become choppy. With the help of easing technique, it becomes less choppy by slowing the animation. To incorporate easing, make sure to find the keyframe assistant menu under animation. As the name suggests, easing tends to ease the key frame’s elements on both sides.
- Adjust Anchor Points
While creating your animated explainer video, anchor points play a vital role and need to be adjusted properly. Actually, it is a point from where all the transformations originate. These points should be correctly aligned first just like a skeleton of the figure. You need to know about the joints such that what makes something rotate. Change the position by dragging the anchor points.
- Connect Elements
After adjusting the anchor points, the next step is to select the child element by clicking on the spiral icon under the parent. These two elements should be paired by dragging the child element to the parent. After doing this, whenever you will make any changes, it will tend to affect both elements.

- Add Motion
You can give motion to the elements using the puppet tool. It adds natural motion with the placement of pins. Here are the steps required to add motion for your explainer video by using animated explainer video software.
· By clicking on the triangle, you will be able to bring up the Deform menu.
· After doing this, make sure to add the puppet pins on the areas where you want to get the motion effect for your video.
· Once you have placed the pins on those areas, use the transform property to ensure stretching or distorting each pin. In your animation, the subject matter will start moving in no time. - Export Your Animation Video
In the last step, make sure to export the animation into a movie. Go to File < Export < Add to render queue to make it possible.


Creating your animated explainer video in Adobe After Effects can seem complicated and can make you frustrated often. You need to opt for an alternative option with easy and simple steps without compromising on the quality of your explainer video. You will be able to create all kinds of animation styles easily if you choose the right animated explainer video software. This is where Mango Animation Maker works for you by offering a wide range of online animation video templates and other necessary features. It enables you to create an animation video in minutes. Let’s learn about our Mango Animation Maker software that what it has in store for you.
Animated Explainer Video Maker – Mango AM
Provided by a reliable animated explainer video company, Mango Animation Maker provides you ease in making your engaging animated explainer video. Being the perfect animated explainer video software, it takes the stress out of the complicated process through powerful functions. Learn about the important key features that Mango Animation Maker provides for your comfort.
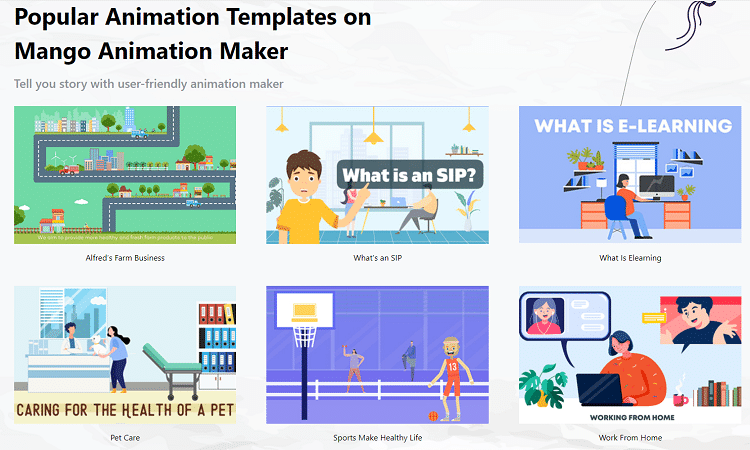
Hundreds of Online Animation Video Templates
Mango Animation Maker provides you a lot of online animation video templates to choose from for your animated explainer video. It makes the process quick as you just need to replace the content. Moreover, you can also opt for custom design by creating your own new project.
Start Creating Amazing Animation Videos & GIFs Easily
3 Types of Animation Effects
It makes the animated explainer video production process hassle-free by offering 3 types of animation effects. By using Mango Animation Maker, utilize entrance, emphasis, and exit animation effects to bring your content to life.
Subtitle & Recording
Mango Animation Maker lets you record your own voice to explain points and customize subtitles in an effective way to keep the audience focused throughout the video.
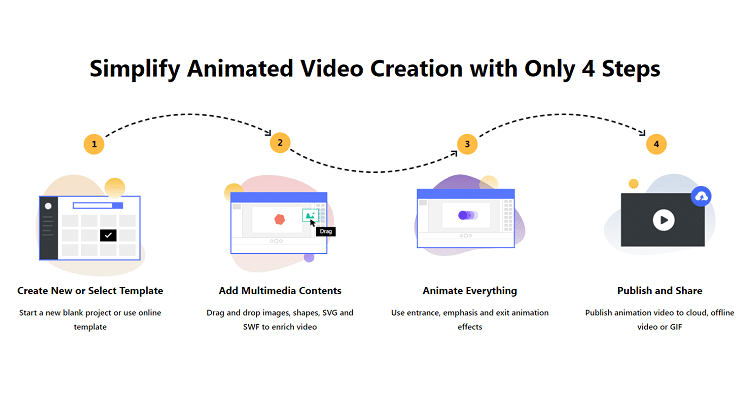
4 Easy Steps to Make an Animated Explainer Video
It provides you with a simple way of creating an explainer animation video by following the 4 easy steps. Start with selecting or creating an animation video template, add multimedia contents, animate everything, and end up publishing or sharing your animated video to grab the attention of the audience.
Final Thoughts
With the help of an animated explainer video, you can ensure generating more traffic for your products or services. Keep your explainer video production effective to raise awareness about your business. Choose the right explainer video company that provides different features to make an explainer video. Mango Animation Maker is a user-friendly animation explainer video software that has thousands of free assets and enables you to make a stunning animation video easily and quickly.
Start Creating Amazing Animation Videos & GIFs Easily